[ main | F.A.Q | news | features | pictures | downloads | build your own ]
![]()
[ main | F.A.Q | news | features | pictures
| downloads | build your own ]
Connecting it...
This part is very much under construction
Some nice pictures to illustrate certain things would be nice...
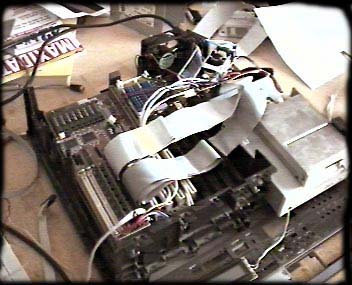
Yes, you'll need a lot of cables! :-)Hopefully this isn't the first time you put a computer together, because the first step is just that... Put your motherboard with CPU and RAM into the case you wish to use. Connect it to the power supply the normal way (black cables in the middle!). If you have some sort of non-standard power supply you have more work to do, check the Hardware Book for the pinout of the motherboard power connector, and find the +/- 5v and +/- 12v outputs from your power supply. The "power OK" signal on the motherboard can simply be connected to +5v through a resistor if your P/S doesn't have this signal. On the above picture you can see that my motherboard is turned the "wrong" way with the power connector far away from the power supply and the ISA slots at the front! This may seem totally weird to you and I don't recommend it unless you really know what you're doing but I do have a reason: cooling. This way I can use one fan for cooling both the power supply (it's small and doesn't have a fan built in) and the CPU at the same time. Anyway, if you put a VGA card in a PCI or ISA slot, connect a monitor and turn the power on you should get a picture with some memory test and a funny "Keyboard not found, press F1 to continue" message or something... If you get smoke instead then it's not my fault ;-)
Boot drive
You need something to boot from, I use a floppy drive because it's cheap, silent and really all you need. You can use a harddisk if you wish. For now you can simply connect the drive of your choice to the floppy or primary IDE connector and connect the power straight to the power supply. You should have some sort of O/S on the disk/a floppy. Also connect a keyboard so you can enter BIOS setup and configure booting from your drive of choice, and while you're in there you should turn on APM sleep mode if you wish to use the "standby" feature and change any "keyboard" and/or "display adapter" options to "not present" if that alternative exists. The reason for this is that it's best if you are able to boot without having a keyboard and VGA card connected. Exit and save changes. Check that booting works. Turn off the power and disconnect the keyboard, check again. If your motherboard refuses to boot without the keyboard you should check the BIOS setup again for any keyboard related options that sound like they might help, and try to disable any "wait for keypress on error" type options. If you can't get the machine to boot without a keyboard then I guess you'll just have to keep it connected :-( If it does boot without any problems, try removing the VGA card and see if it boots without it. (seeing in this case doesn't mean looking at the monitor but rather observing activity LEDs and listening for any activity from your boot drive. If the machine seems to load your Operating System like before be happy, if not - keep the VGA card in the machine.
CD-ROM drive
If you are going to use one - connect it as secondary master because this is the only options supported in the software right now.
Non-booting harddrive
Right now there is no support in the software, but connect is as primary master just like you would a booting harddrive.
ISA cards
Unless your motherboard has a built in SoundBlaster, you will need at least one of these. The big problem is not how to connect these but rather to make them fit in the case. You will either have to use a very large case or a so-called "riser card", that connects to one ISA slot and has a few ISA slots on it, enabling you to put your sound and network cards parallel to the motherboard. Unless you mounted the motherboard like me with the ISA slots at the front - skip the next two sections.
Sound card - advanced
Maybe not all that "advanced" but still you need to do some work unless you want your line output sticking out from the front panel! The simplest way is to make a cable with a 3,5mm stereo phone plug at one end and two panel mount RCA jacks at the other. Just connect the phone plug to "line out" on the sound card and put the RCA jack on the back panel of the case - this looks just like any other piece if HiFi equipment. If you can't fit the phone plug, just solder directly on the sound card (carefully!).
Network card - advanced
The NIC is a bigger problem since most home LANs are coaxial ethernets and the Ethernet specs clearly states that you can't have more than an inch or so of cable between the T-connector and NIC. One solution is to put the T-connector and terminator inside the case, but this isn't exactly very flexible. My "solution" to the problem was to simply ignore the specs and put a cable between the NIC and back panel. Guess what, it works just fine! I don't know how this will work on a larger network, but it works for me.
Serial "service" connector
Since my player works without a monitor or keyboard I've configured the Linux kernel with a serial console. This means that all debug information is sent to the first serial port and also that there is a shell on this port when the boot process is done. I recommend that you make this port available at the rear of the machine, just use one of the serial connectors you got with the motherboard and connect it to the COM1 connector on the m/b. To use this port you should connect it with a null modem cable to another computer and set your terminal program to 9600N1.
Connecting the uC board
It's time to put this thing you've built into good use... You should first connect it to the power supply (ground and +5v) with a suitable cable. If you cut the 12v (yellow) cable on a 3,5" floppy power connector you can connect this to the board. If you don't cut the yellow cable you'll make the PS and/or uC-board very unhappy! Secondly, you should connect the serial data from the board to the motherboard's second serial port. It shouldn't be too hard to make a simple cable that connects directly to the connector on the m/b. The problem is that the pinout on the motherboard may be different for different boards. Use a multimeter on one of the serial connector cables you got with the m/b to find out what goes where. Many other things connect to this board as well but I'll get to them later...
The LCD
Most of the connections from your LCD module should go to the parallel port of the motherboard like this:
LPT pin: LCD pin 14 -> RS 17 -> E 2...9 -> DB0..DB7 GND -> W/R Note that LPT pin numbers are on the DB25 connector, they may be different when you look at the IDC connector on the motherboard. W/R can simply be tied to ground at the LCD. Consult the data sheet for your LCD to find the pin numbers for the different signals. Three more lines should be connected from the LCD to the uC board, those are GND, +5V and LCD power (contrast adj.). There is no support for backlights right now, coming sooner or later... :-)
Front Panel Keys
The keys on the front panel are connected to the uC board in a matrix configuration. Up to sixteen buttons can be used, but changes must be made to the software if you connect them any other way than this:
Col 1 Col 2 Col 3 Col 4 Row 1 Skip+ Search+ Stop Row 2 Play Search- Skip- Row 3 Options Playlist Standby Row 4 Memory Repeat Random Eject (CDROM)
If you look at the component drawing for the uC board you can see the keypad connector, counting from the bottom to the top the pins are: Row 1,2,3,4, Col 1,2,3,4. You'll find the player very hard to control if you connect these the wrong way :-)
Standby power relay
If you wish to use the standby mode (not working right now) you should connect a relay that breaks both +5v and +12v to your CDROM, floppy and harddisk. Connect the relay coil between +5v and the relay pin on the uC board.